In the beginning, this was supposed to be a part of my article about visiting Cracow, but I’ve decided that it will be better to turn it into a separate post. I’m an iPhone user for quite some time, and yet I’m still being surprised at times with the way its camera works. You can take amazing photos with this phone. Just go to my previous article and see for yourself. What’s more, taking and editing photos to make them look fantastic is no black magic, it’s a child’s play actually. My guide will walk you through the process, enjoy!
So, traveling! We enjoy it, we do it whenever we can (well, most of us), and we surely would like to bring home some souvenirs from the breathtaking places we saw. And what’s the better souvenir than a good photo? But if you don’t expect to print your pictures in a large format, it makes no sense to wear the equipment that weighs several kilos. Telephones now have great cameras, and iPhones in my opinion, are a masterpiece. Sure, not every smartphone offers a decent camera, but for iPhone 6 and above I stand guarantee.
Taking photos via phone and image processing
What is needed?
Phone with a good camera, and yes…. I believe iPhone is the best option. However, if you are using a different phone, don’t let my beliefs discourage you, I’m quite aware of the fact, that there are smartphones on the market equipped with very sophisticated cameras.
Also, VSCO App and attractive, photogenic places. After many years of shooting, I can honestly say – equipment is not even a half of the success. If we find something extraordinary, we can manage to take a breathtaking photo with a regular phone.

Smart(phone) Photography Tips
- When you take pictures, move away a little bit to leave some room for possible frame straightening. Especially when you shoot architecture – then frame in such way that you will easily by able to cut a bit of the photo later.
- Remember about the proper exposition. The photograph can not be overexposed. Touch the brightest point so the camera can measure the light there. You can change the exposure level on your iPhone camera before taking a picture. To take a good picture in the bad lighting, start by tapping the brightest spot you see on your screen. A small yellow box with a sun icon will pop up to mark your focal point and default exposure level. To make your image brighter or darker, tap and swipe up or down without lifting your finger to increase or decrease exposure. You should see the sun icon move up or down with your finger.
- Try to make it straight. Lines, frames, and walls should be vertical, parallel to the edge of the frame. A simple way to straighten your shots is to turn on grid lines. Simply go to Settings > Photos & Camera on your iPhone and tap the toggle next to “Grid” to turn on grid lines.
- Mix the composition. In addition to setting the subject of the photo in the center of the frame, shoot on a three-part basis.
- If you are planning to publish photos on Instastories, take pictures in portrait mode.
- You should almost never use flash. Natural lighting is more flattering for photos.
- You should also never use digital zoom. Instead of zooming in, get closer to your subject.
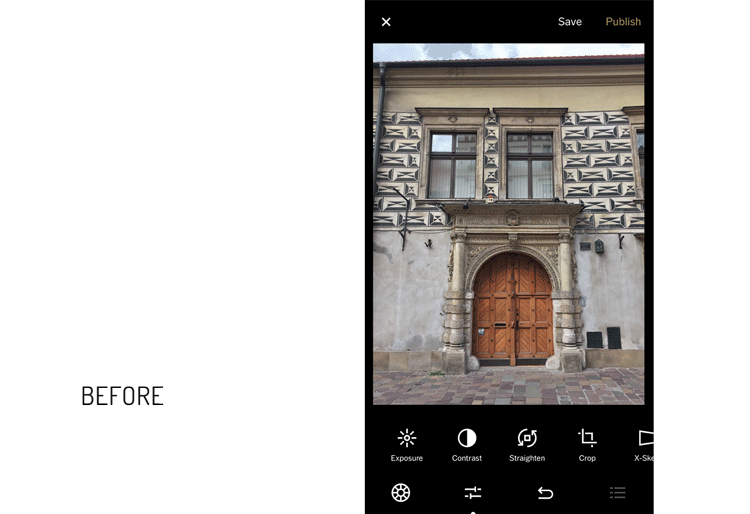
Postproduction
Or more simply – the retouch of pictures. For this, I use the VSCO application, which is free of charge. Some of the presets are also free, while some are paid. I use only the free ones. Using this App is child’s play and, most importantly, it allows you to copy the settings from one photo and paste them into many. This really makes work easier and faster.
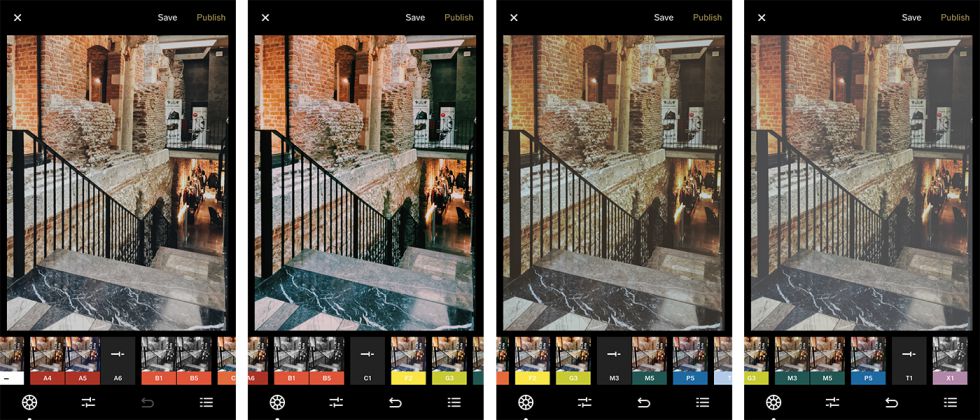
Once you have downloaded and installed the VSCO, take a look at this short tutorial
- Add photos to the application using the plus button in the top corner
- Touch a picture, then select the edit using the slider icon at the bottom.
- Select the filter/presets that best suit you (my favorite is A6)
- Click again on the sliders at the bottom of the screen.
- Now you can still improve your photos by correcting exposure, contrast and above all the frame, i. e. straighten x-skew and y-skew
- The wow effect is achieved by increasing sharpen, clarity and saturation
- If the sky is too bright or other items are overexposed on your picture, then correct highlights
- For a soft, low-contrast image without strong shadows, try Shadows. The application brightens them.
- Grain adds a vintage-like look, the picture looks as if it was taken with an old analog camera
- After pressing Save you can copy your settings. Choose a picture, click on the three dots in the bottom right corner, Copy Edits, select another picture or several photos, again three dots and Paste Edits.
- Exporting photos is about selecting one or many images, clicking three dots and Save to Camera Roll. You can also share it directly on social networking sites or publish it on your VSCO profile.
VSCO Tips
- In addition to using a filter, correct the image with advanced tools. The filter will not always look the same in every photo. Sometimes you need to make some adjustments to get the best effect.
- At the beginning select the filter and pick the rest of the settings in one picture. This will be your own preset, which you will copy to other photos. This will speed up the work and make all your photos look consistent.
- Select the photos for a single set. Ok, you can use the previous preset, but photos taken in a different light may require, for example, reducing the exposure.
- You can also take pictures using the VSCO App. It gives you more options than a standard iOS application. You can, for example, set the focus, white balance, ISO, shutter speed (setting the shutter speed to a longer exposure time allows you, for example, to take great photos of the starry sky.